
SuperTrend Trend Following Strategy: How to Build It in Arrow Algo
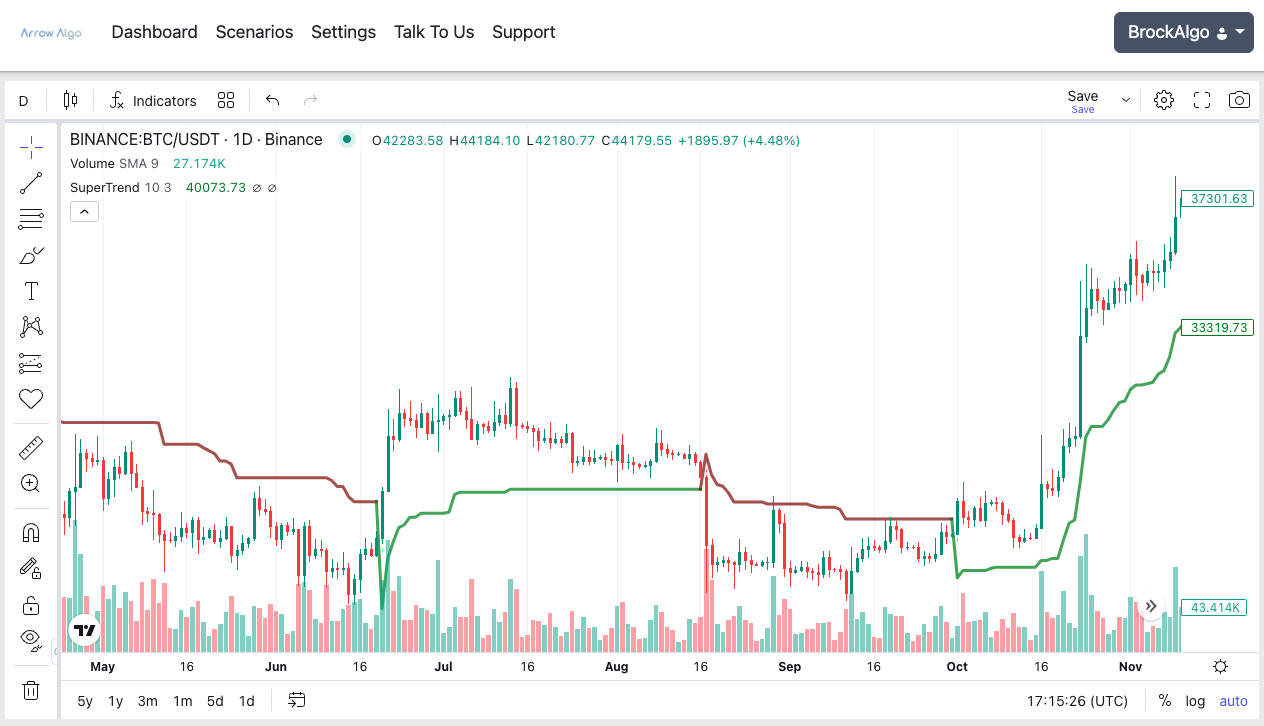
A SuperTrend strategy wraps trend direction, entry signal, and trailing stop into one line on the chart. The indicator plots a band below price in an uptrend and above price in a downtrend, and flips sides when price breaks through it. Because the band’s distance is scaled by volatility, the stop breathes with the market — tight in quiet conditions, wide in wild ones. That volatility awareness is what separates it from a simple moving-average system.
What Is a SuperTrend Strategy?
A SuperTrend strategy trades the indicator’s flips. Band below price and green: the market is in an uptrend, and the band marks your stop level. Band above price and red: downtrend. When price closes through the band, the indicator switches sides — the trend is declared over and a new one begins.
Like the Parabolic SAR we covered in yesterday’s strategy guide, SuperTrend is a stop-and-reverse system: it always has an opinion, long or short. The difference is what drives the stop. SAR accelerates with time; SuperTrend adapts to volatility.
How Does the SuperTrend Indicator Decide Direction?
Two settings control everything: the ATR period (commonly 10) and the multiplier (commonly 3). The indicator takes the Average True Range — a measure of recent candle size, explained well by Investopedia — multiplies it by the factor, and offsets that distance from the midpoint of each candle. In an uptrend the band ratchets upward: it can rise or hold, but never falls. Meanwhile in a downtrend, the reverse.
In plain English: the band trails price at a distance of “three normal candles’ worth” of movement. Price has to make an abnormal move against the trend to flip it. Raise the multiplier and flips become rarer but later; lower it and the system reacts faster but whipsaws more.
What Do the Signals Mean?
- Flip to green (band moves below price): uptrend begins — the long signal.
- Flip to red (band moves above price): uptrend over — exit, or the short signal.
- Distance from the band: price far above a rising band means a healthy trend with room; price hugging the band means the trend is being tested.
- The band level itself: a ready-made, volatility-adjusted stop-loss at every moment of the trade.
Which SuperTrend Strategies Are Worth Building?
Raw flips traded in both directions bleed in ranging markets. Two structures fix that.
Strategy A: Filtered Flips
- Entry: SuperTrend flips green while price is above its 200-period EMA — you only take longs that agree with the larger trend, a core principle of trend trading.
- Exit: the next red flip. The trailing band manages the trade for you.
- Character: few trades, long holds, designed to catch the big legs and sit through noise.
Strategy B: Double SuperTrend
- Setup: two SuperTrends — a slow one (e.g. 20 period, factor 4) for regime, a fast one (e.g. 10 period, factor 2) for timing.
- Entry: the fast one flips green while the slow one is already green.
- Exit: the fast one flips red — you’re out before the slow trend fully unwinds.
- Character: earlier exits and re-entries within one larger trend, at the cost of more trades.
Building a SuperTrend Strategy in Arrow Algo, Step by Step
- Drop in a SuperTrend block and connect your candle feed. Period and multiplier are editable properties — no formulas to write.
- Add an EMA block and a condition block for the trend filter (Strategy A), or a second SuperTrend block with slower settings (Strategy B).
- Detect the flip with a crossover block on price and the band, and combine it with your filter as the entry gate.
- Route the opposite flip to your exit, or wire the band level into your stop logic directly.
- Backtest both variants on the same pair and timeframe using live exchange data from Binance, Coinbase, or HyperLiquid, and compare trade counts, drawdown, and profit factor before choosing.
What Are the Common Failure Modes?
- Sideways chop. Every stop-and-reverse system loses in ranges. The filter is not optional — it is the strategy.
- Over-tuned settings. The pair 10/3 works broadly because it is roughly right everywhere. A backtest-perfect 13/2.7 is usually noise dressed as precision.
- Violent reversals. ATR adapts with a lag. A single news candle can blow through the band and fill you well past it — position sizing remains the real protection.
- Ignoring the timeframe. On low timeframes crypto’s noise forces constant flips. Most SuperTrend systems behave better on 4-hour and daily charts.
The Takeaways That Matter
- A SuperTrend strategy trades volatility-adjusted band flips: direction, entry, and trailing stop in one indicator.
- The ratcheting band never loosens mid-trend — it locks in progress the way a disciplined manual trader wishes they would.
- Filter flips with a long-period EMA or a slower SuperTrend; unfiltered both-ways trading bleeds in ranges.
- Standard settings (10, 3) are a feature, not laziness — robustness beats backtest perfection.
- Arrow Algo’s SuperTrend block makes both the filtered and double-SuperTrend builds pure drag-and-drop — see the full SuperTrend reference guide for the indicator’s complete background.
Disclaimer: This content is for educational purposes only and does not constitute financial advice. Trading involves significant risk and you should only trade with capital you can afford to lose. Past performance is not indicative of future results. Always conduct your own research before making any trading decisions.
Ready to build your own automated trading strategies without writing a single line of code? Start for free at Arrow Algo and join thousands of traders who’ve made the switch to systematic trading.